The manufacturing of solar panels begins with converting sand into solar cells which are ultimately integrated into solar modules. The quality of a solar panel depends on the standard of the EVA sheet, glass, back sheet, solar cells, and the manufacturing equipment used to assemble the module.
Though manual manufacturing of solar panels still takes place, the rapid evolution of the solar industry has resulted in automation of most aspects of how solar panels are made.
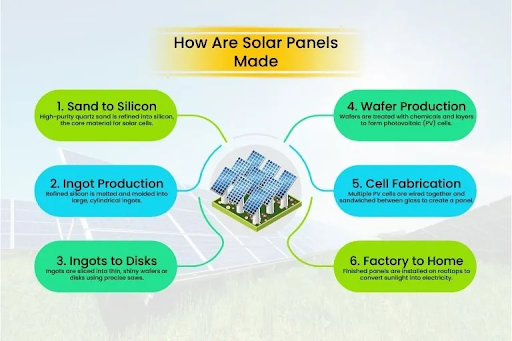
Solar cells are the fundamental building blocks of solar panels. Before we understand how solar panels are made, we must go through the steps for manufacturing solar cells.
Here’s how solar cells are manufactured:
Since most solar cells are made of silicon, we will discuss how solar cells are made from silicon.
Silicon is the 2nd most abundant element in our planet after oxygen. It is available in the form of sand. Quartz sand has to be converted to metallurgical-grade silicon which is further purified to a 100% pure polysilicon.
So how to convert sand to silicon? It is a two-step process:
Silicon dioxide(sand) is combined with carbon(in the form of charcoal, coal, wood etc.) in an electric arc furnace. The temperature of the furnace is raised to 2200 °C.
The chemical reaction produces 99% pure silicon and carbon monoxide. Below you can find the chemical reaction for converting silicon dioxide to silicon:
SiO2 + 2 C → Si + 2 CO
100% pure polysilicon is required for producing solar cells. Therefore, the silicon produced in the above reaction is further purified by using methods such as the Siemens process. The basic idea is to combine hydrogen and chlorine gas with silicon.
The chemical reaction for converting silicon to polysilicon is as follows:
Si + 3 HCL→ HSiCl3+ H2→Si + HCl + Cl2 + H2
Connect with Our Energy Advisors
An ingot is a material that has been cast into a particular shape, typically rectangular like a gold bar.
To create a silicon ingot, the polysilicon is put in a container and heated to melt it into a liquid state. The molten silicon is solidified into an ingot by using methods such as the Czochralski process or directional solidification.
Usually, at this stage boron is added to the silicon to impart a positive charge to one side. This process is called doping and without it, the silicon cannot conduct electricity. To learn about the importance of doping, you can read our blog on how solar panels work.
Depending on the process used, the ingot can be monocrystalline or polycrystalline. Monocrystalline solar cells are more efficient than polycrystalline ones. However, the manufacturing of polycrystalline solar cells has a cost advantage.
Diamond-coated wire saws are used to slice the ingots into wafers.
Usually, the wafers have a thickness of 200 to 300 micrometres and a diameter of 150-200 millimetres. Wafers with diameters of 300 mm or more have even greater efficiency.
The sawing leads to the creation of silicon sawdust and it removes the kerf part. If a manufacturer wants to avoid it, he or she can opt for kerfless wafer production by using gaseous silicon compounds to place a thin layer of silicon in the shape of a wafer on a silicon crystal or by taking off layers from a molten form of silicon.
The wafers are heated and doped with phosphorous on the side opposite to the boron-doped surface. It leads to a positive-negative (p-n) junction which is important for creating an electric field.
Cell fabrication is done to remove any flaws and impurities and to enhance the efficiency of the solar cell. The wafer goes through chemical texturing to remove any sawdust.
Since the wafer is shiny, it reflects a lot of light. It is an undesirable trait in a solar cell because it can reduce the production of solar electricity. So anti-reflective coating is added to the wafer.
Texturing is done by using methods such as photolithography or mechanically cutting the surface with a laser or special saws. If the texture pattern has upward-pointed pyramids, then it is called random pyramid texturing, and if it has downward-pointed pyramids it is called inverted pyramid texturing.
Screen printing of silver metallisation is often done to increase the conductivity and performance of the solar cells.
The electricity generated by the solar panel needs a path to travel. This path is created by soldering fingers and busbars to the solar cell.
The electricity first goes to the fingers and then to the busbars. Then it goes to the external circuit via the junction box.
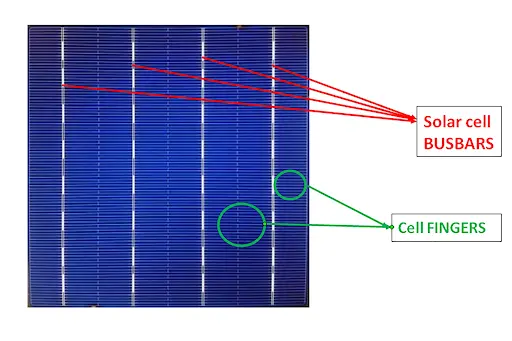
Till now, we have discussed how a solar cell is produced from sand. Now we will discuss how solar cells are put together to create a solar panel. Please note that we will cover the automated production of solar panels since manual production has become out of date.
Get competing quotations from vendors to install your solar system
If you would have bought a solar panel a decade ago, it would have probably had 72 cells.
However, nowadays you will find that solar panels have 144 cells. What happens is that those 72 cells are split in half resulting in 144 cells. These cells are called half-cut cells.
Why is this done? Because it increases the efficiency and reduces the power loss in the solar cells. Half-cut cells can produce electricity even if they are partially covered by a shadow. Traditional solar cells lose their power generation capacity almost entirely when they are covered by shadow.
Solar cells are sold with a dimension of 182 x 182 mm. With non-destructive cutting (NDC), the solar cells get a dimension of 182 x 91 mm.
Laser is used for cutting. Water may or may not be used in the process.
An NDC machine can have a cell-cutting speed of 10,000 cells/hr.
Here’s a video which explains how NDC is done:
https://www.youtube.com/watch?v=Xgalun_NtKY
Credits: Ooitech China
After cutting the cells, the cells need to be put together. It is done by a stringing machine. The cells are assembled in a 12 x 12 format by a process called tabbing and stringing. Here’s a brief description of each:
Once the solar cells have been strung together, they can be used in a solar panel.
EVA sheets are one of the most important components of a solar panel. They are placed at the front and rear of the solar strings. EVA sheets protect the solar cells from dirt and moisture and provide stability to the solar cells.
An EVA loader cuts the EVA sheet as per the proper dimensions. Then a machine puts the EVA sheet on top of a glass.
Throughout the production process, buffer systems are placed at several points. If any solar module has problems, it can be temporarily kept there so that the rest of the production line continues unaffected.
In the “Lay Up” section, the solar strings are overlaid on the EVA sheet and glass combination. Each half of the solar panel has 72 cells, thus the whole panel has 144 cells.
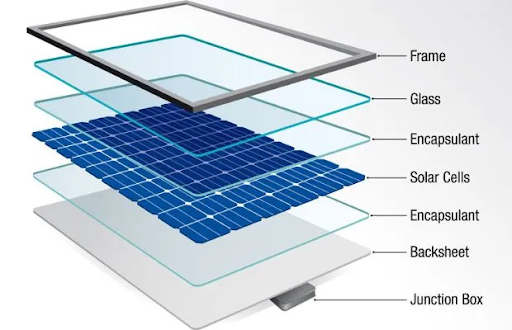
An automatic bussing machine solders the negative and positive terminals of the busbars of the solar cells. Thus all the solar cells are connected in a circuit.
Auto-bussing is better than manual bussing because it is a lot more accurate, minimises the risk of damage to the solar cells, and saves a lot of time.
Auto-taping is done to ensure that the solar cells remain properly aligned during lamination. It is better than manual taping because the latter can damage the solar cells and some portions could remain without taping.
Here’s a video showing the working of an auto-taping machine:
https://www.youtube.com/watch?v=REuT5GcOwOo
Credits: Ooitech China
On the front side of the solar panels, a small EVA sheet is put over the area where the junction box will be installed.
An EVA loader puts an EVA sheet on the rear of the solar panels. Workers in the factory put a barcode on the EVA sheet for the sake of identification.
A back sheet loader puts a back sheet on top of the EVA sheet. The barcode is mentioned on the back sheet.
However, all solar panels do not have a back sheet. Some also have glass in the rear. It increases the durability of the solar panel.
No correction in the solar module is possible after lamination. That’s why it is important to check the solar cells before lamination.
A pre-installation EL test can detect the following:
You can ask the solar manufacturing company for the results of the pre-installation and post-installation or final EL test results. They can show you the X-ray documents showing the result.
Want an expert to install your solar system? Our experts are here to help you
A laminating machine laminates the solar cell, glass, and EVA sheet combination. The process takes 20 to 25 minutes.
The lamination leads to some rough exterior edges. An auto-edge trimming machine trims the edges.
Workers check the solar panel visually for proper alignment, microcracks, barcodes, and RFID tags. Then the panel is sent for framing.
Auto-framing machines are used to create the frame of the solar panels. The frames are made of anodised aluminium.
The top and bottom sections have a width of 35 mm and the side sections have a width of 2100 mm. These frames have pre-defined holes for earthing and mounting.
An automatic sealant dispenser pours a sealant along the edges of the solar panel frames. The auto-framing machine locks the frame along the edges of the glass, solar cell, and EVA sheet combination.
The junction box has 3 terminals, 2 on the left and right side and 1 in the middle of the panel. Sealant is applied to the junction box and attached to the rear of the solar panel.
An “Auto JB Solder” solders the junction box to the solar panel.
There is also a cavity on the other side of the junction box facing the rear. A sealant is applied here to ensure no moisture settles in the cavity.
The curing section is a place where temperature and moisture are maintained so that the sealant can dry. Solar panels are kept here for 3 to 4 hours.
Now the solar panels are ready for testing. After that, they can be sold in the market.
Several tests are done to ensure the performance and durability of solar panels. While some tests are done at the level of the solar panels, others are done for the individual components.
Here’s a list of the major tests carried out at a solar panel manufacturing plant:
| Name of the Test | Test Applied On | Equipment Used for the Test |
| Electroluminescence (EL) Test | Module | EL Tester |
| Sun Simulator Test | Module | Sun Simulator |
| Insulation Test | Module | Hi-Pot and Insulation Tester |
| Hi-Pot Test | Module | Hi-Pot and Insulation Tester |
| Wet Leakage Current Test | Module | Hi-Pot and Insulation Tester |
| Ground Continuity Test | Module | Hi-Pot and Insulation Tester |
| Bypass Diode Thermal Test | Module/Junction Box | DH and PID Test |
| Thermal Cycling (TC) Test | Module | TC and HF Chamber |
| Humidity Freeze (HF) Test | Module | TC and HF Chamber |
| LeTID Test | Module | TC and HF Chamber |
| Damp Heat (DH) Test | Module | DH and PID Chamber |
| PID Test | Module | DH and PID Chamber |
| Retention Test of Junction Box | Module | Robustness of Terminals Tester |
| Junction Box Pull Test | Module | Robustness of Terminals Tester |
| Static Mechanical Load Test | Module | Mechanical Load Tester |
| Dynamic Mechanical Load Test | Module | Mechanical Load Tester |
| UV Preconditioning Test | Module | UV Chamber |
| Performance at Low Irradiance | Module | Sun Simulator |
| Sun-soaking Test | Module | Outdoor Exposure Structure |
| IP Rating Test | Junction Box | IP Rating Structure |
| Peel Strength Test | Cell and Ribbon | Auto Peel and Lap Shear Tester |
| Encapsulant Gel Content Test | Encapsulant | Hot Air Oven |
| Adhesion Test | Glass, Encapsulant, and Back Sheet | Auto Peel and Lap Shear Tester |
| Tensile Test | Encapsulant, Back Sheet, and Ribbon | Auto Peel and Lap Shear Tester |
One of the most important tests solar panels go through is the sun simulator test. In this test, the performance of the solar panel in different conditions is measured. You can find the results of these tests in the datasheet of the solar panel you buy. Some of the metrics you can check are:
Under Standard Test Conditions (STC) the conditions are as follows:
While the STC is a purely laboratory construct, it is equally important to test the solar panels in a real-world scenario. This is where nominal operating cell temperature (NOCT) testing comes into the picture. The conditions for NOCT testing are:
Solar panel manufacturing is a highly intricate process. While the mono-PERC manufacturing process is widely available in India, many have successfully transitioned to manufacturing TOPCon panels as well. Broadly, the manufacturing process for both is similar and with some modifications, a mono-PERC manufacturing factory can produce TOPCon solar panels as well.But the rise of HJT represents a challenge. Its production is a lot more complex and expensive. If the demand for HJT panels rises, manufacturers will have to invest in its manufacturing as well. Currently, the big players like Adani Solar and Reliance Industries are best positioned to enter HJT panel manufacturing.
Ultimately, to bring down the cost of production and reliance on imports, solar companies, government institutions, think tanks, and universities will have to invest in research and development of how solar panels are made.
The manufacturing process is highly complex. First sand has to be converted into solar cells. Then different components such as glass, EVA sheet, back sheet and solar cells are assembled to create the solar module.
It is a set of conditions under which the performance of a solar panel is evaluated. In this condition, the irradiance is 1000W/m2, cell temperature is 25°C, and air mass is 1.5.
Busbars are installed on solar cells by soldering. Usually, they are made of copper and have a silver plating.
Cell cutting increases the power output, efficiency, and performance of the solar cells under shadow. Which solar panel is the toughest to manufacture?In terms of the cost and complexity of the manufacturing process, HJT solar panels are the toughest to manufacture.
Our installation partners will check your requirements and send you quotations within 48h hours.
Your site visit will be scheduled at the provided location. The team will connect for a better experience.